Newton’s Nook Designs September Release and Giveaway – Day 2


Hello and welcome to Day 2 of the Newton’s Nook Designs September Release!

All the new September products will be avaliable for purchaise on Friday, September 15th at Newton’s Nook Designs online store and other craft retailers!

Eat Drink And Be Scary #handmade luminaries by Tatiana Trafimovich #tatianacraftandart - Creepy Cameos stamp set by Newton's Nook Designs #newtonsnook
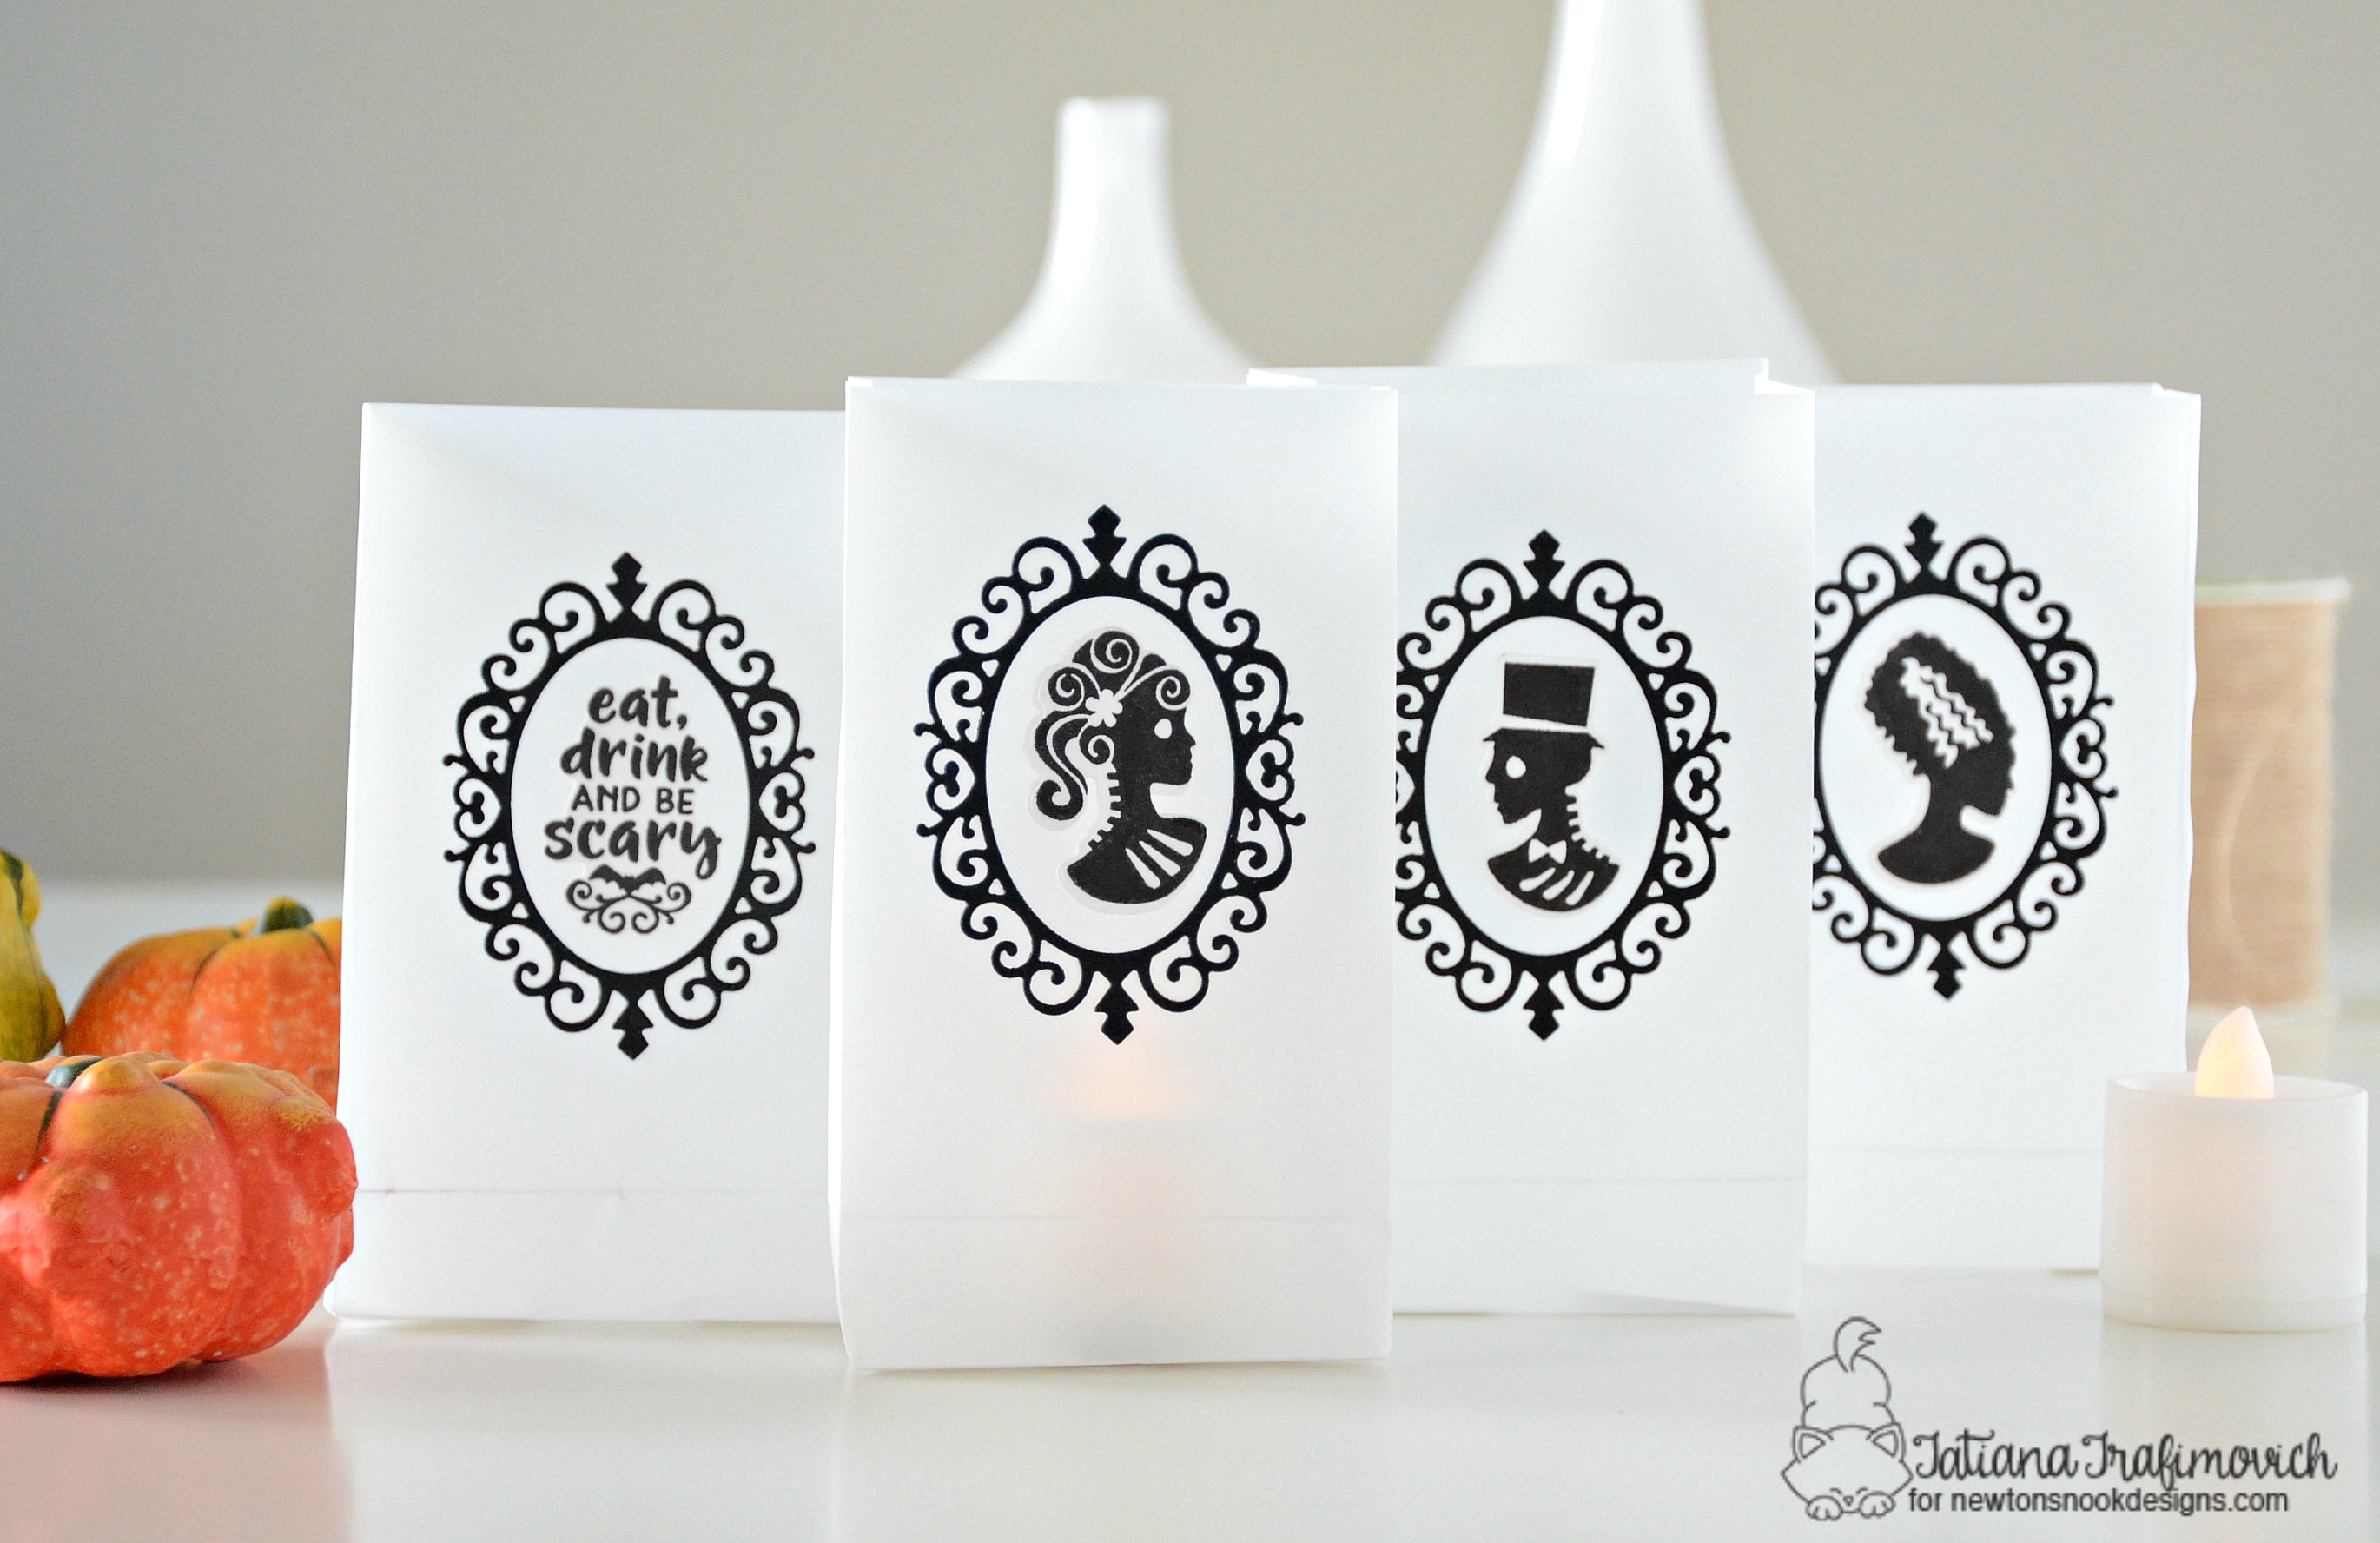
Today I’m sharing a cute idea on how to make a DIY home decor for Halloween using beautiful and sophisticated stamps from Newton’s Nook Designs new Creepy Cameos stamp set, the coordinating dies and Cameo Frame Die!!!

Giveaway alert!! NND is giving Creepy Cameos stamp set away to one lucky winner so make sure you read all the way to the bottom of this post to see how to win!
 

Since I usually make cards, I thought it would be nice to come up with a DIY home decor and share some ideas for Halloween!!! By the way, the new Creepy Cameos stamp set and Cameo Frame Die seem soooo perfect for luminaries! I stared by creating some DIY paper bags out of vellum since vellum would let the light come through, but you definitely can use any thin paper for that or even get some paper bags from your local store. White or kraft colors will suit this projects very well! Once finished with the paper bags, I stamped the creepy cameos and the sentiment with a crisp black pigment ink and die cut them using the coordinating dies! There’s no coordinating die for the sentiment so it was simply fussy cut with my scissors. I was afraid to smudge the ink on the sleek vellum surface, but you can simply stamp or heat emboss the sentiment directly on top!

Eat Drink And Be Scary #handmade luminaries by Tatiana Trafimovich #tatianacraftandart - Creepy Cameos stamp set by Newton's Nook Designs #newtonsnook 
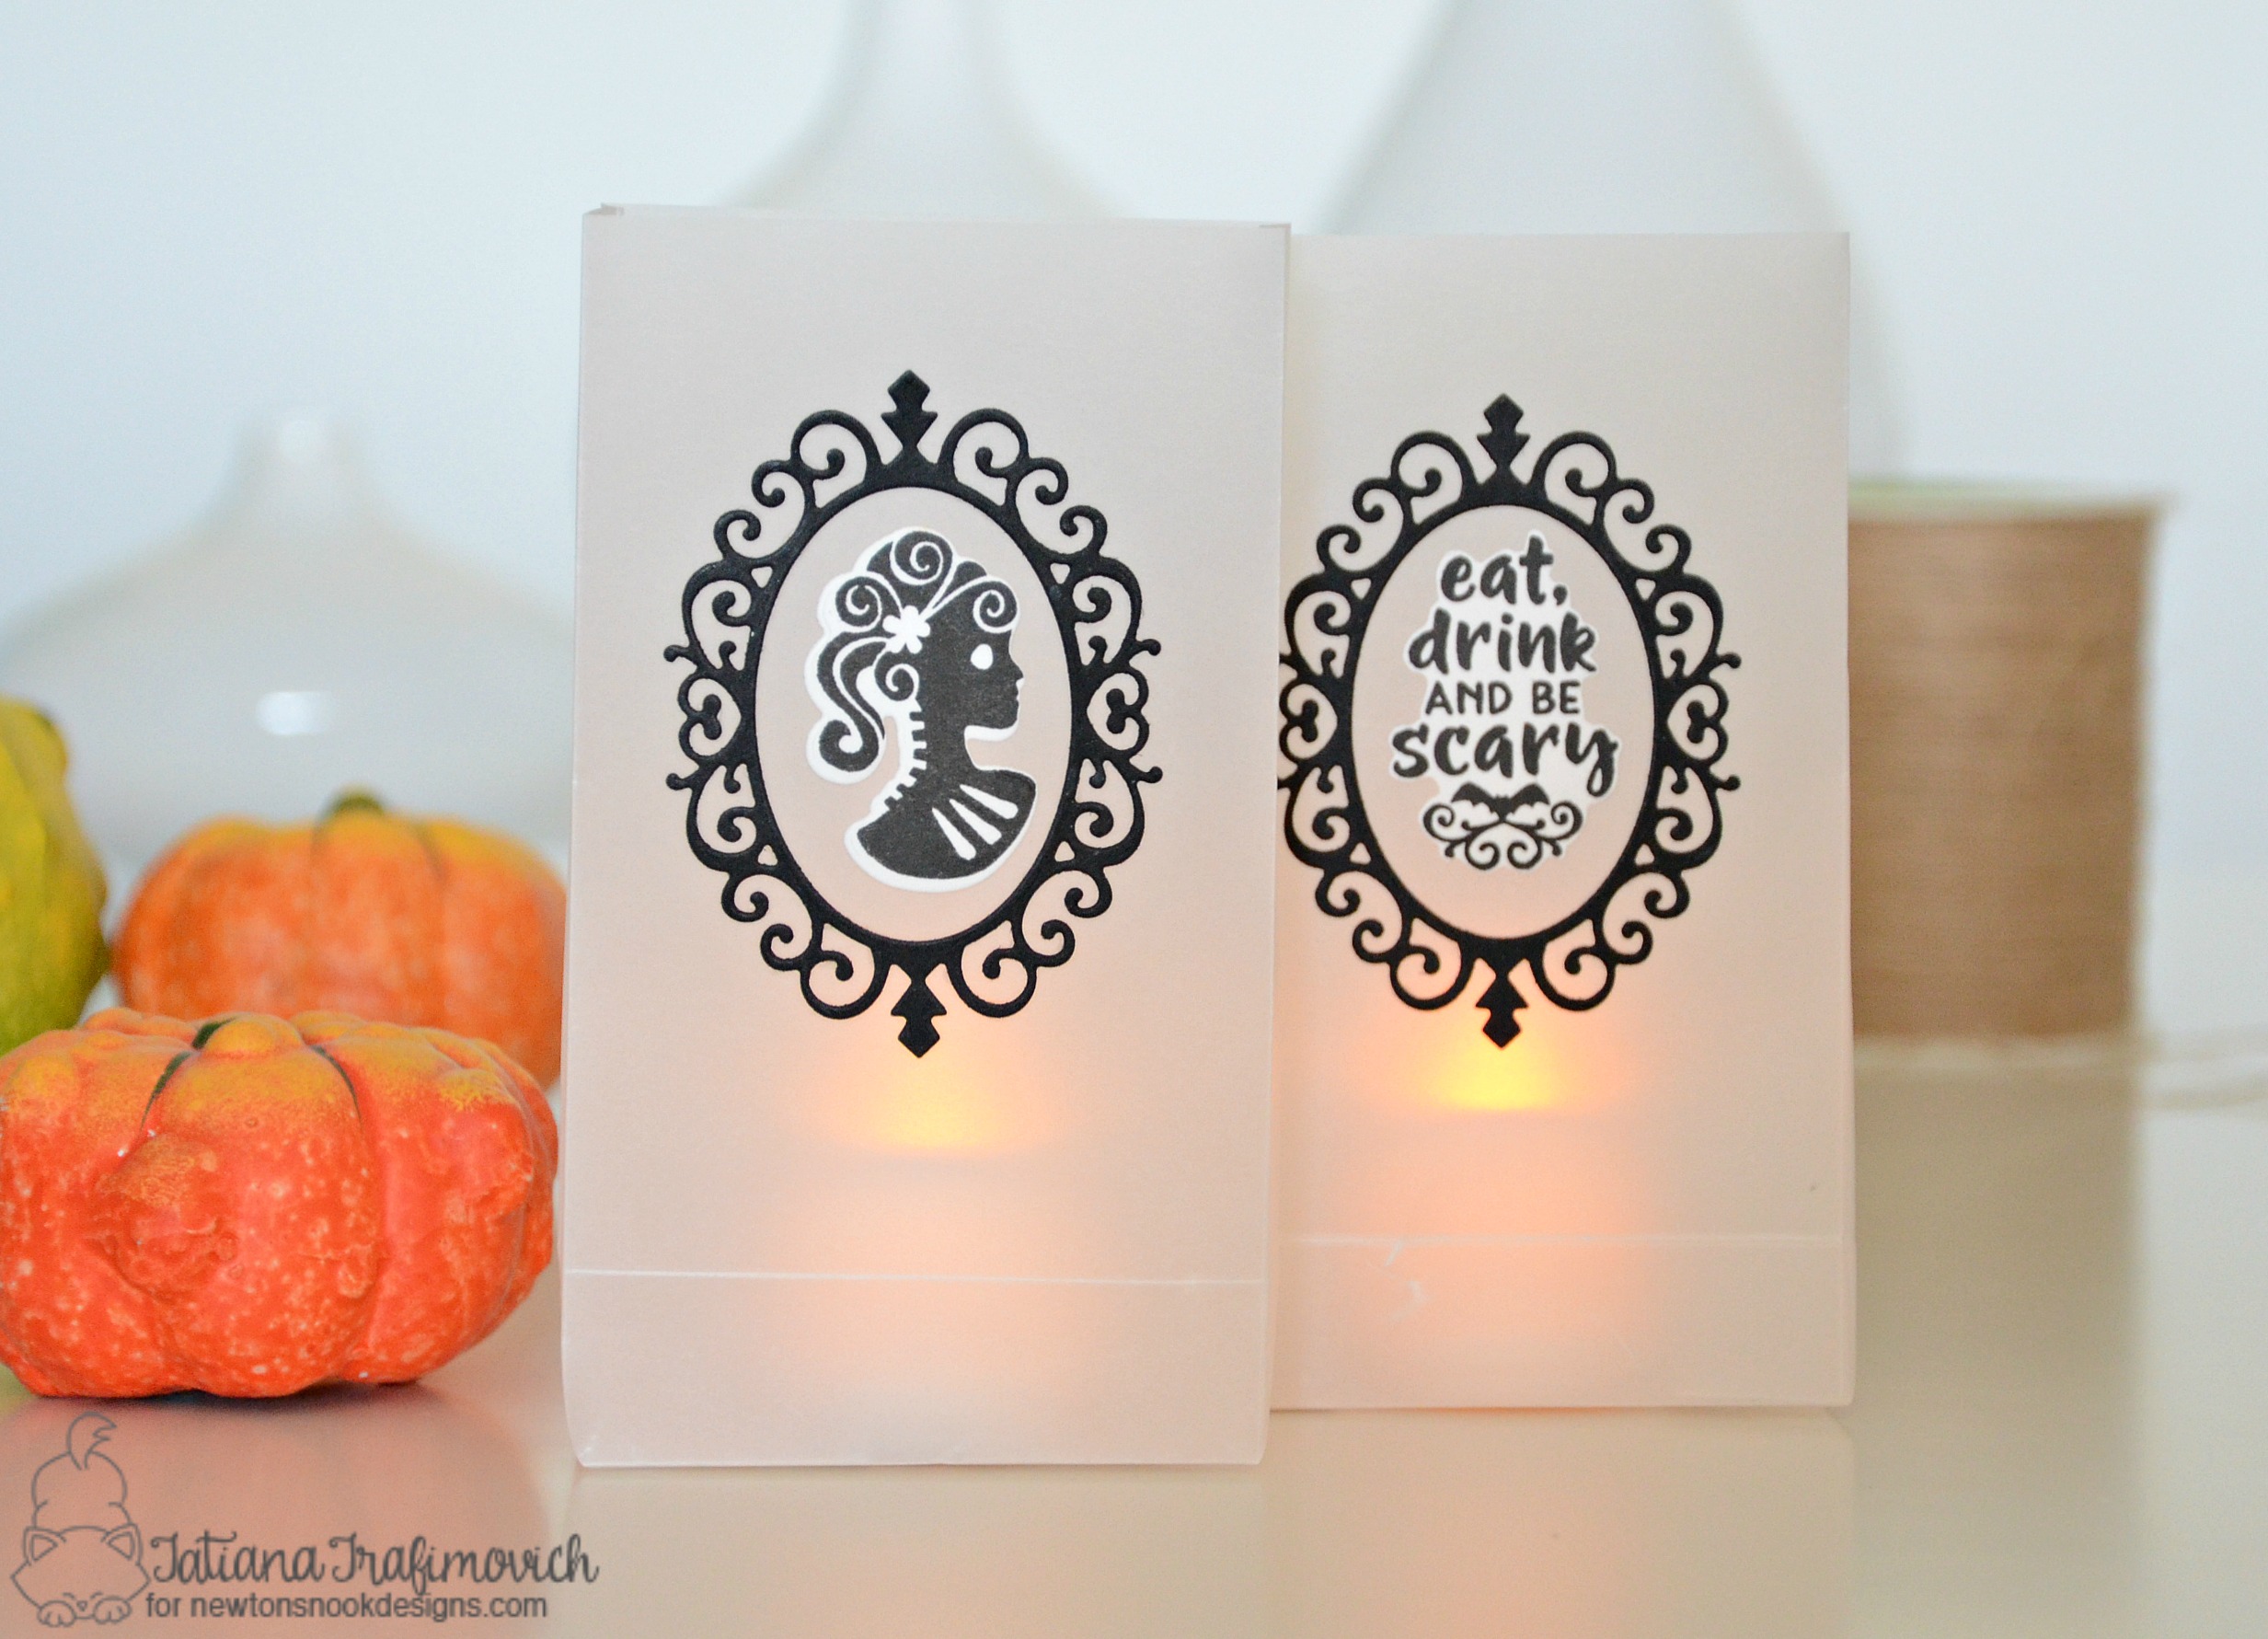
Finally I die-cut a bunch of intricate cameo frames from a black cardstock and assembled all the elements. I decorated both sides of every bag putting a cameo image on one side and the sentiment on the other! So fun and easy! Why don’t you try it maybe with your children?!

Eat Drink And Be Scary #handmade luminaries by Tatiana Trafimovich #tatianacraftandart - Creepy Cameos stamp set by Newton's Nook Designs #newtonsnook

Would you like to win the “Creepy Cameos” Stamp Set?
This set will be given away to ONE lucky winner!

Here’s how to win:

Comment on the NND blog and Design Team blogs (see list below)! The winner will be chosen at random from the collective reveal posts. Make sure to check out each of their blogs and comment for your chance to win. You will not know which blog has been chosen so the more you comment on the better your chances are of winning! You have until Thursday September 14th at 9pm CST to comment  — winners will be announced on the blog post on Friday, September 15th.

Check out all the awesome Design Team Blogs below to enter:

Newton’s Nook Designs
Amanda Bodine
Holly Endress
Ellen Haxelmans
Larissa Heskett
Samantha Mann
Juliana Michaels
Naki Rager
Maria Russell
Jennifer Timko
Tatiana Trafimovich <– you’re here

Thanks so much for stopping by and have a fantastic day!

Tatiana

WARNING!!! FOR SAFETY REASONS THIS PROJECT IS SUITABLE ONLY FOR FLAMELESS TEA LIGHTS!!! DO NOT USE REAL FIRE SINCE THE PAPER IS HIGHLY FLAMMABLE!!!

SalvaSalva

SalvaSalva

SalvaSalva

DIY Halloween Treats

halloween-treats-2016-1

Hello guys!

I’m so excited to share with you a fun Halloween project I came up with. It’s super simple to do and you don’t need any fancy craft supplies to recreate it! So why not! Perhaps you can make it with your children as well!

I’d like to mention that this project was inspired by a talented paper crafter Anna Kossakovskaya. I made a girlish and a boyish version of chocolate boxes since I’m going to give the treats to my little niece and nephew, but you can personalize this project even more by adding a name, for example.

halloween-treats-2016-2

halloween-treats-2016-4

First of all you gonna need a piece of card stock and a chocolate bar, of course. Take measures of your chocolate bar (width, length and heights), calculate the dimensions of the card stock you need for the project and mark the score lines on it:

Horizontally: half of your width – heights – width – heights – half of your width.

Vertically: any measure you like up to half of your length – heights – length – heights – any measure you like up to half of your length.

Make score lines as indicated on the picture below. If you don’t have a scoring board, use a simple ruler (anyone has a ruler at home, right!).halloween-box-1Now cut out 4 corners following the graphic below. And you DIY chocolate box is done.halloween-box-2Now all you have to do is to apply some embellishments and tied a twine around to close the box. On my projects I used digital stamps from Jess Crafts Digitals and a freebee digital sentiment from Newton’s Nook Designs as I could resize them to fit my box, but you definitely can use anything you have on hand: print and color any Halloween image from web, use some stickers or any other embellishment to suit your occasion.

halloween-treats-2016-6

halloween-treats-2016-7

halloween-treats-2016-3

halloween-treats-2016-5Hope so much that you like the idea and you’ll give it a try!!!

That’s all for today! If you have any question, leave it in the comment area below! And as always thanks so much for stopping by! Have a great day!

Tatiana

COPICS:

cat E40-E41-E43-E44-E47-E49                      YG00-YG01-YG13

cat W00-W1-W3-W5                                         RV10-RV02-RV04

BV00-BV01-BV13-BV17                                   YR16-YR07

N1-N3-N5

SUPPLIES:

Happy Halloween Card (for SSS Work It Wednesday Challenge) – Autumn & Halloween Card Series

Hi, all!

Today I want to share with you two cards that I created for Simon Says Stamps Work It Wednesday Challenge. Since SSS has the STAMPtember® event the challenge this month regards stamps. I tried to use different types of stamps for my card: the sentiment and the image stamps from SSS HEY PUMPKIN stamp set and the WOODEN PLANK background stamp from Impression Obsession. I also added some sequins for the embellishment.

Halloween 2014 (1)

I embossed the background stamp with Clear Ranger Super Fine Detail Embossing Powder and colored the cute cat images and the banner in the middle with Copic Markers so that they match perfectly. Finally I adhered everything with foam tape.

Halloween 2014 (3)


To create the second card I diecut two circles on the front of the card and attached the cat images inside.


Hey Pumpkin 2014 (4)


Hey Pumpkin 2014 (3)


Hope you like these cards.

Tatiana