2019 SugarPea Designs April Release: Day 5

Congrats #handmade card by Tatiana Trafimovich #tatianacraftandart - For The Graduate stamp set by SugarPea Designs #sugarpeadesigns

Hello and welcome to the final day of the SugarPea Designs April Product Release!

I hope you’ll join SPD Design Team todays because we’ll be sharing Sweet Peeks for the products that will be available for purchase starting this Friday, April 26th at 6 PM EST in the SPD Store.

Each day was full of inspiration, and as always, you’ll have a shot at winning one of FIVE GIVEAWAYS!  All you need to do is leave a comment for your chance to win.

**Please note that links to our store for these new products will not go LIVE until 6PM EST on April 26th.**

Today’s Introductions include… so amazing For The Graduate stamp set and the coordinating For The Graduate SugarCuts. And more the matching Congrats Word Sugarcut and very artsy Follow Your Dreams stamp set.


For my stop on this hop I made a cheerful and bright rainbow card! I started this project by die cutting a lot of colorful stripes from scratch cardstock I have in my stash with just released Card Front Element Builder II set. I saved the negative part of the die to help me align all the stripes perfectly on the card front.

Congrats #handmade card by Tatiana Trafimovich #tatianacraftandart - For The Graduate stamp set by SugarPea Designs #sugarpeadesigns

Next I die cut from Neenah Solar White paper some hats using For The Graduate SugarCuts and used once more the negative part of the dies to help me stamp the matching images from For The Graduate stamp set. Lately I generously covered the hats with a clear shimmer pen to bring more interest and shine. The sentiment was built by using Congrats Word Sugarcut and a narrow strip where I heat embossed “So Proud Of You” from the same For The Graduate stamp set.

Congrats #handmade card by Tatiana Trafimovich #tatianacraftandart - For The Graduate stamp set by SugarPea Designs #sugarpeadesigns

Give
Would you like to win the For The Graduate?  Leave a comment below.
You have all week to comment!  Winners will be announced on Sunday, April 28th.

Blog-Hop-GreenSPD Design Team has some amazing and creative inspiration for you using the products featured here today. You can visit each of our designers’ blogs below for details on their projects. And while you’re there be sure to leave a sweet comment for them, giving you an extra entry to win today’s giveaway prize.

Tatiana Trafimovich <– you’re here

That’s all for today! Hope you like these cute cards! Thanks so much for stopping by and have a great day!!!
Tatiana

Simple And Elegant Wedding Card Plus Video (ft. Newton’s Nook Designs)

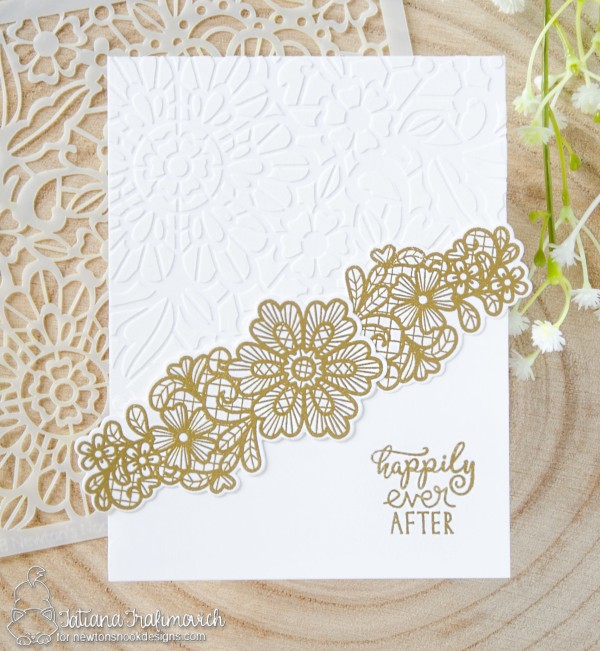
Happily Ever After #handmade card by Tatiana Trafimovich #tatianacraftandart - Blooming Botanicals stamp by Newton's Nook Designs #newtonsnook

Hello and welcome!!!
I’m so happy you’ve joined me today and even more excited to be on the Newton’s Nook Designs blog sharing a simple and elegant heat embossed wedding card!

I’m playing with amazing big flower Blooming Botanicals and Wedding Frills stamp sets. For the layout I made some die cutting with Frames & Flags Die Set.

To start, I inked a piece of Neenah Solar White cardstock with Hydrangea Dye ink from Simon Says Stamp using Picked Fence Life Changing Blender Brushes. Next I heat embossed large background using Blooming Botanicals stamp and VersaMark ink. It’s a great way to get more use out of such big stamps. You can achieve beautiful piece in no time at all and there’s no need to color every single flower.

Happily Ever After #handmade card by Tatiana Trafimovich #tatianacraftandart - Blooming Botanicals stamp by Newton's Nook Designs #newtonsnook

The stitched frame and a flag piece used for the layout come from Frames & Flags Die Set. Finally the sentiment was added from Wedding Frills stamp set and the whole piece was embellished with lots of tone on tone sequins adhered with Multi Medium Matte glue since it dries clear.

Happily Ever After #handmade card by Tatiana Trafimovich #tatianacraftandart - Blooming Botanicals stamp by Newton's Nook Designs #newtonsnook

Hope this project will inspire you to get another look on the big stamps you have in your stash! As always thanks so much for stopping by!
Tatiana

SalvaSalva

SalvaSalva

SalvaSalva

SalvaSalva

SalvaSalva

SalvaSalva

SalvaSalva

SalvaSalvaSalvaSalva

SalvaSalva

SalvaSalva

SalvaSalva

SalvaSalva

SalvaSalva

SalvaSalva

SalvaSalva

SalvaSalva

SalvaSalva

SalvaSalva

SalvaSalva

SalvaSalva

SalvaSalvaSalvaSalva

SalvaSalva

SalvaSalva

SalvaSalva

SalvaSalva

SalvaSalva

Newton’s Nook Designs March Release and Giveaway – Day 2 – Wedding Frills


Hello and welcome! So happy you’ve joined me today for Day 2 of the Newton’s Nook Designs April Release!

All the new April products will be available for purchase on Friday, April 20th at Newton’s Nook Designs online store and other craft retailers!

Happily Ever After #handmade card by Tatiana Trafimovich #tatianacraftandart - Wedding Frills stamp set by Newton's Nook Designs #newtonsnook

The cards I’m sharing today turned out very elegant and classy and were inspired by beautiful new Wedding Frills Stamp Set (that comes with the coordinating dies) and Floral Lace Stencil. Both products have gorgeous, intricate design and will bring your projects to a whole new level!!!

Giveaway alert!! NND is giving new Wedding Frills stamp set away to one lucky winner so make sure you read all the way to the bottom of this post to see how to win!

My first card is a very classic wedding one. In fact, a tone on tone embossing is paired with a metallic gold shine that is so typical on wedding cards and invitations.

Happily Ever After #handmade card by Tatiana Trafimovich #tatianacraftandart - Wedding Frills stamp set by Newton's Nook Designs #newtonsnook

I started with a white A2 size card base and Floral Lace Stencil. Once transferred the beautiful lace design with a plain white embossing paste, I left everything air dry and started working on Wedding Frills Stamp Set. I put a generous coat of an antistatic powder before doing heat embossing to keep all the embossed lines clear. I stamped and heat embossed twice using a fine gold embossing powder the biggest stamp from Wedding Frills Stamp Set and the sentiment on the additional white panel cut at an angle. The coordinating dies helped me to die-cut quickly the elements. Assembling the card, I popped the heat embossed elements on a foam tape for a bit of dimension and skipped any other embellishments.

Happily Ever After #handmade card by Tatiana Trafimovich #tatianacraftandart - Wedding Frills stamp set by Newton's Nook Designs #newtonsnook

My second card is made on kraft card base because I just looooove the look of white against kraft color.

MR & MRS #handmade card by Tatiana Trafimovich #tatianacraftandart - Floral Lace stencil by Newton's Nook Designs #newtonsnook

I used the same plain white embossing paste and transferred the pattern from Floral Lace Stencil, let it air dry and then die-cut with Frames & Flags die set. I also die-cut a stitched scalloped edge on a vellum strip using NND Sky Borders die set and wrapped it around the lace pattern with a matching kraft twine.

MR & MRS #handmade card by Tatiana Trafimovich #tatianacraftandart - Floral Lace stencil by Newton's Nook Designs #newtonsnook

I customize my own sentiment die-cutting letters with Essential Alphabet Die sets on a gold metallic paper and finally arrange and adhered the letters. I think it would be awesome recreate this card with names of bride and groom! What do you think?

MR & MRS #handmade card by Tatiana Trafimovich #tatianacraftandart - Floral Lace stencil by Newton's Nook Designs #newtonsnook

Would you like to win the “Wedding Frills” Stamp Set?
This stamp set will be given away to ONE lucky winner!

Here’s how to win:

Comment on the NND blog and Design Team blogs (see list below)! The winner will be chosen at random from the collective reveal posts. Make sure to check out each of their blogs and comment for your chance to win. You will not know which blog has been chosen so the more you comment on the better your chances are of winning! You have until Thursday April 19th at 9pm EST to comment  — winners will be announced on the blog post on Friday, April 20th.

Thanks so much for stopping by and have a fantastic day!

Tatiana

SalvaSalva

SalvaSalva

SalvaSalva

SalvaSalva

SalvaSalva

SalvaSalva

SalvaSalva

SalvaSalvaSalvaSalva

SalvaSalva

SalvaSalva

SalvaSalva

SalvaSalva

SalvaSalva

SalvaSalva

SalvaSalva

SalvaSalva

SalvaSalva

SalvaSalvaSalvaSalva

SalvaSalvaSalvaSalvaSalvaSalva

SalvaSalvaSalvaSalvaSalvaSalvaSalvaSalva

SalvaSalva

SalvaSalva

SalvaSalva

SalvaSalva

SalvaSalva

SalvaSalva

SalvaSalva

SalvaSalva

SalvaSalva

SalvaSalva

SalvaSalva

SalvaSalva

SalvaSalva

SalvaSalva

SalvaSalva

SalvaSalva

SalvaSalva

SalvaSalva

Video Tutorial – Copic Coloring Background (ft. Crafting Desert Divas)

Copic Background Tutorial by Tatiana Trafimovich #tatianacraftandart - Magical Unicorns stamp set by Craftin Desert Divas #craftindesertdivas
Hello and welcome!

Since some of you asked me to make a tutorial on a copic background I shared in this post last week, I put up a quick video tutorial for you using Magical Unicorns stamp set from Craftin Desert Divas! You can find a complete list of the copic markers I used in the video along with the other products at the bottom of this post!

Hope this video is helpful for you! Thanks so much for stopping by! I really appreciate it a lot!

COPIC MARKERS:

background YR30-YR31-YR21             unicorn W00-W1-V04-BG11-RV23-Y17

SUPPLIES:

Magical Unicorns

Memento Dye Ink Pad – Tuxedo Black

DISCLOSURE:

As a Design Team Member I’m affiliate to Craftin Desert Divas online shop. Where available I use their compensated affiliate links which means if you make a purchase I receive a small commission at no extra cost to you. I really love their products and enjoy using them. All opinions are my own. I truly appreciate your support and will use the money raised to bring you more crafting projects.

SalvaSalva

SalvaSalva

SalvaSalva

SalvaSalva

SalvaSalva

SalvaSalva

SalvaSalva

SalvaSalva

SalvaSalva

SalvaSalva

SalvaSalva

SalvaSalva

SalvaSalva

SalvaSalva

SalvaSalvaSalvaSalva

SalvaSalva

SalvaSalva

SalvaSalva

SalvaSalva

SalvaSalva

SalvaSalva

SalvaSalva

SalvaSalva

SalvaSalva

SalvaSalvaSalvaSalva

SalvaSalva

SalvaSalvaSalvaSalva

SalvaSalvaSalvaSalva

SalvaSalva

SalvaSalva

SalvaSalva

SalvaSalva

SalvaSalva

Crafting Desert Divas – March Release Replay – Hitched


Hello and welcome!

Sharing today another look on sooooooo adorable Hitched stamp set from the Craftin Desert Divas March Release!

Now & Forever #handmadecard by Tatiana Trafimovich #tatianacraftandart - Hitched Stamp Set by Craftin Desert Divas #craftindesertdivas

I just loooooove these cute images: elegant, romantic and cute at the same time. Really perfect for wedding and anniversary projects. And so I grabbed another just married couple from Hitched stamp set and as always stamped with a copic friendly black ink on Neenah Solar White paper, colored with copic markers and then fussy cut leaving a little white border around.

Now & Forever #handmadecard by Tatiana Trafimovich #tatianacraftandart - Hitched Stamp Set by Craftin Desert Divas #craftindesertdivas

Next I started working on the background and built a sunset scene on a stitched rectangle from Fancy Frame Dies set. I masked the sun rays with two pieces of a sticky tape and added color with Distress Oxide inks and an ink blending tool. Where available I provide direct links to all the products I used on the project along with a complete list of colors at the bottom of every post. Once added the sentiment from Simply Said set, I was ready to assemble everything. I “grounded” the couple in the car on a matching stitched border die from Fall Border Dies set and added some dimension adhering the elements on a foam tape. The last finish touches were shimmer pen and a few clear sparkling sequins.

Now & Forever #handmadecard by Tatiana Trafimovich #tatianacraftandart - Hitched Stamp Set by Craftin Desert Divas #craftindesertdivas

That’s all for today! Hope you like this cute and simple card! Need more inspiration? Please, check Craftin Desert Divas Gallery on Facebook for more amazing projects and inspiration from the Design Team, freebies and awesome giveaways! As always thanks so much for stopping by!

COPIC MARKERS:

hair E31-E33-E99                              hair E40-E47-E49-E99                   YG21-YG93-YG95
skin E000-E00-E11-BV000             V0000-V12-V15-V17-V09               Y00-Y21
C1-C3                                                  W7-W10

SUPPLIES:

Hitched

Simply Said

Fancy Frame Dies

Fall Border Dies

Shimmer Sequins


Distress Oxide – Fossilized Amber

Distress Oxide – Spiced Marmalade

Distress Oxide – Abandoned Coral

Distress Oxide – Peeled Paint

Memento Dye Ink Pad – Tuxedo Black

Cutter Bee Scissors 5″

Craft Tweezers

Inkssentials Glossy Accents .5oz

Multi Medium Matte

Zig Wink Of Stella Brush Glitter Marker – Clear

White Gelly Roll Medium Point Pen

Mono Sand Eraser

DISCLOSURE:

As a Design Team Member I’m affiliate to Craftin Desert Divas online shop. Where available I use their compensated affiliate links which means if you make a purchase I receive a small commission at no extra cost to you. I really love their products and enjoy using them. All opinions are my own. I truly appreciate your support and will use the money raised to bring you more crafting projects.

SalvaSalva

SalvaSalva

SalvaSalva

SalvaSalva

SalvaSalva

SalvaSalva

SalvaSalva

SalvaSalva

SalvaSalva

SalvaSalva

SalvaSalva

SalvaSalva

SalvaSalva

SalvaSalva

SalvaSalvaSalvaSalva

SalvaSalva

SalvaSalva

SalvaSalva

SalvaSalva

SalvaSalva

SalvaSalva

SalvaSalva

SalvaSalva

SalvaSalva

SalvaSalvaSalvaSalva

SalvaSalva

SalvaSalvaSalvaSalva

SalvaSalvaSalvaSalva

SalvaSalva

SalvaSalva

SalvaSalva