Hello and welcome!
Can’t believe that we’ve already reached the the last day of the Newton’s Nook Designs 4 year anniversary July release!!! Hope you like all the new FASTASTIC products and enjoying the Design Team inspiration projects!!!
All the new July products will be avaliable for purchaise on Friday, July 14th at Newton’s Nook Designs online store and other craft retailers!

Today I’m SUPER EXCITED about new Newton stamps that come with cute Cosmic Newton set!!! After his western adventures, the adorable kitty decided to visit other planets and galaxies!!! Isn’t he super cute in his space coveralls?! And, of course, you can get the coordinating dies with Cosmic Newton Die set.
Giveaway alert!! NND is giving a $20 store credit to Newton’s Nook Designs to one lucky winner so make sure you read all the way to the bottom of this post to see how to win!

This stamp set just screams for me to be used with some interactive elements! You can make the cute mischief slide and spin on your fun projects! And the galaxy background is, of course, another must for me on the space theme cards! And no need to tell you how well it coordinates with new Starfield Stencil!!!
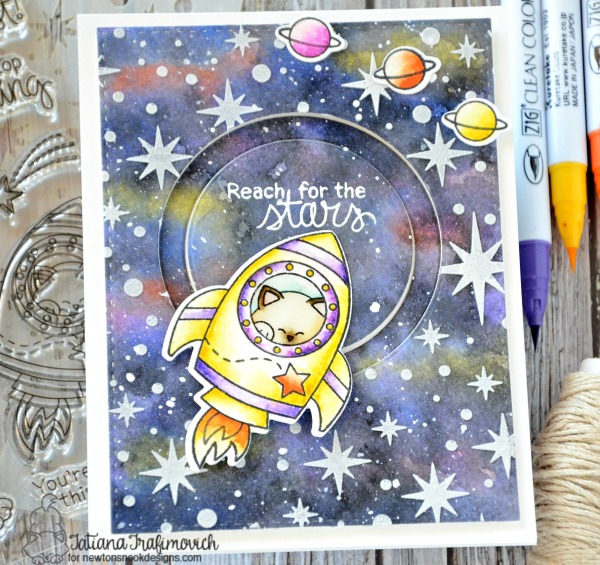
I stretched my watercolors this time and worked on a watercolor paper! I stamped the kitty with a waterproof ink, die-cut with the coordinating Cosmic Newton Die and made a little bit splotchy non perfect watercoloring! Then I proceeded with the galaxy background: first I made a colorful undertone painting on some areas with bright yellow, orange, red and pink colors; I heat set this first layer and brought on top more dark blue, violet and black colors and finally flicked some white gouache on top creating tiny stars! Once the background was dry, I created an interactive element using a specific die, but you can easily make the similar effect with two circle nesting dies! Before assembling the card, I applied throung Starfield Stencil a white embossing paste to bring more stars to my backgroung and heat embossed the sentiment from the same Cosmic Newton stamp set!
The spinner mechanism is very easy to assemble too: punch or die-cut two circles slightly larger than the spinner channel. Put one circle directly on the card base and adhere another on top with a foam tape, but above the background panel this time. Then use the top circle as a base for you interactive element! Just be sure to use a glue that dries non sticky for easy spinning!

Would you like to win a $20 store credit to Newton’s Nook Designs?
ONE lucky comment will be chosen from each reveal day to win!
Here’s how to win:
Comment on the NND blog and Design Team blogs (see list below)! The winner will be chosen at random from the collective reveal posts. Make sure to check out each of their blogs and comment for your chance to win. You will not know which blog has been chosen so the more you comment on the better your chances are of winning! You have until Thursday July 13th at 9pm CST to comment – winners will be announced on the blog post on Friday, July 14th.
Check out all the awesome Design Team Blogs below to enter:
Newton’s Nook Designs
Amanda Bodine
Holly Endress
Ellen Haxelmans
Larissa Heskett
Samantha Mann
Juliana Michaels
Naki Rager
Jennifer Timko
Tatiana Trafimovich <– you’re here
As always thank so much for stopping by!!!
Tatiana
SUPPLIES:
SalvaSalva
SalvaSalva
SalvaSalva
SalvaSalva
SalvaSalva
SalvaSalva
SalvaSalva
SalvaSalva
SalvaSalva
SalvaSalva
SalvaSalva

 Hi there Sugar Peeps!!!


 SPD Design Team has some amazing and creative inspiration for you using the products featured here today. You can visit each of our designers’ blogs below for details on their projects. And while you’re there be sure to leave a sweet comment for them, giving you an extra entry to win today’s giveaway prize.